Back
BackMenu
Our skin is supposed to be uncompleted without Menu skinning. You create your own custom skin for Menu component by modifying attributes in "Properties pane" ofSkinBuilder application.
Modifying properties you should ensure that changes are displayed properly in Preview area and there is no need to reassign them.
If the changes you adjust were not shown you should click Refresh button on Toolbar or to ensure that the appropriate checkbox in "Default Controls" is checked.
Now let's start the creative part of skin making. Images you want to use for skinning should be already created and everything you have to do is to insert them in corresponding fields of "Properties pane"thereby changing the graphical representation of Menu element.
 Note:
Note:
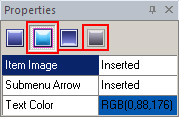
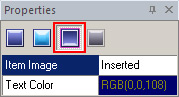
Don't forget that SkinBuilder supports Normal, Highlighted, Pressed and Disabled states for Menu control which should be customized in Properties pane.
 |
 |
 |
Normal |
Highlighted and Disabled |
Pressed |
As there are too many attributes corresponding to Normal state let’s skin it for instance being guided by the following steps:
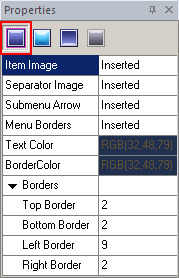
 Import pre-created images in "Item Image", "Separator Image", "Submenu Arrow", "Menu Borders" attribute fields by clicking "Browse" button (
 ). In appeared "Select File" windows show the paths to your images.
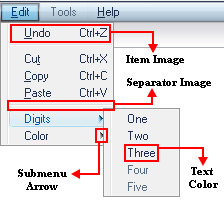
- Item Image attribute is intended to determine a background for items that appear when you click main menu items (File/Edit and etc.).
- Separator Image attribute is for menu group items delimitation.
- Submenu Arrow attribute requires an image to show menu items which have pop-up subitems.
- Menu Borders separate each menu item one from another.
Specify "Text Color" and "Border Color" properties taking advantage of built-in color palette or choose "Custom Color" as alternative for color selection.

"Border Color" attribute can be modified in case you don’t customize "Menu Borders" property. It means that you enable to assign an image in "Menu Borders" property or to choose a color for menu borders.
Define (Top/ Bottom/ Left/ Right) Borders values that allow you to specify the size of a client area frame.