Working area
Before starting your creative process you are recommended to organize the working place according to your taste. Some advanced settings described below allow you to configure background image and preview method. To know panes manipulation and smart docks managing will be useful too.
Center preview. By clicking  button in SkinBuilder toolbar you choose Center preview mode when skinned window moves in the center of the screen. It can serve as a convenient way of tracking skin effects. It will give you better sense of what to expect with each change.
Show/hide mode.
Show/Hide mode allows you to have comprehensive presentation of skin. To enable this option, press  button on toolbar. As a result, all active panes disappear and you may observe all skin benefits in real conditions with/without selected background. Show/Hide is a reversible button, so you can turn back to initial point by clicking on the same button repeatedly.
Set background.
The Background option allows you to configure background colors or images for your Working area, to activate this functionality press  button on SkinBuilder toolbar. As a result, "Background color and image" dialog appears where you are enabled to choose specific color or image file for background of your working area.


You are encouraged to use individual approach to design your workspace by selecting Color and Image together when it can be necessary. Image position can be adjusted as well.
Windows manipulation.
Windows manipulation will help you prepare new skins quickly, easily and efficiently.
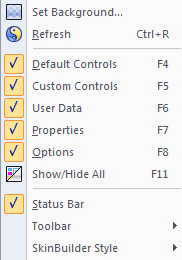
Windows manipulation will allow you to suit your own preferences for panes size and location. In general you can arrange and adjust SkinBuilder windows in custom size. You can also handle panes with drag-and-drop mouse functionality and deactivate all the windows by pressing reversal F11 key. Hotkeys for window switching are displayed in menu "View" too.
Tip.
Use the following assigned keys to show/hide necessary windows.

Smart docking.
SkinBuilder has pane-positioning feature called Smart docking. It allows precisely repositioning of panes within your workspace.

When you drag any panel positioning buttons (arrows) appear in the centre of the screen. If you drop the pane on the particular arrow it locates on the workspace correspondent to arrow's direction.
See also Zoomer section for zoomer window customization.

 Back
Back