
 Back
BackWindow Frame
General introduction is left behind and now the studies of SkinBuilder individual components are proceeded. Let's start with the Window Frame skinning.
Frame is a basis of all application windows and the most complicated part of skinning. "Properties pane" contains all items necessary to change the look of the Window Frame.
Having SkinBuilder launched (Start/ Programs/ SkinCrafter/ SkinBuilder) and new .skf file created ("Create new skin" option in "Splash Window"/ save file in "Create New File" dialog), check the availability of skin images you need to have already done.
 Notes:
1. There is no built-in image editor in SkinBuilder.
2. Regions for frame to have the shape we want must be created simultaneously with frame assembling by means of built-in Region Editor.
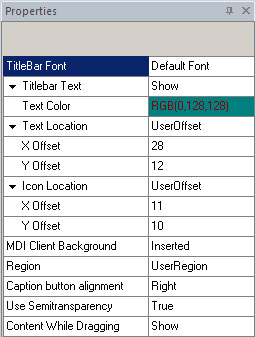
Frame consists of Top/ Bottom/ Left/ Right sides that can be skinned with ready-to-use images and can be represented as dissected window:
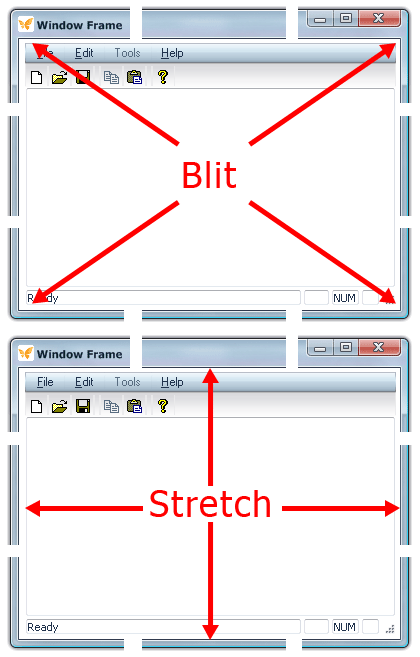
All sides consist of several images (according to our example we have 3 images for each side); the middle images are stretched to enhance the size of the whole window avoiding damages, the first and third images are used for corners which are to be Blit.
Checking the appropriate checkbox in "Default Controls" will make it possible to control settings of Window Frame through "Properties pane". Items provided below in "Properties pane" with all possible alternatives are quite clear from the titles.
Some of the obscure points will be clarified below:
1. Titlebar Texta. Show 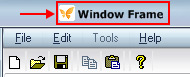
b. Hide 
2. Text Color
3. Text Location
a. Left
b. Centre
c. Right
d. UserOffset>>X Offset>>Y Offset: is intended for definition of text position in layout,
X offset determines distance from the left and Y offset determines distance from the top.
4. Icon Location
a. With Text
b. UserOffset>> X Offset>>Y Offset: position of icon in layout, X offset determines distance from the left and Y offset determines distance from the top.
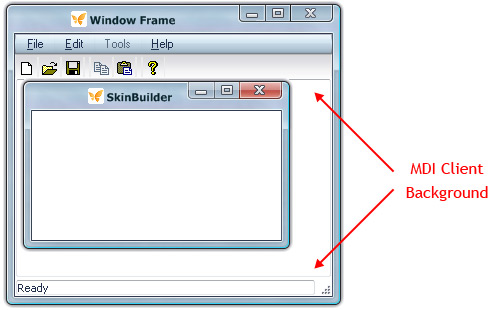
5. "MDI Client Background". To put a bitmap on "MDI Client background" you need to find it among the images you prepared earlier. Updating and repainting the surface of "MDI Client background" can be done by arrangement of an according bitmap in "MDI Client Background" field and by defining necessary settings in "Options pane". Simply, it is an image used to fill the MDI client area not covered with MDI child windows.
Notes:
- "MDI Client Background" property for Frame Window does not support the semi-transparency.
- If the sum of horizontal/vertical frame's blitted regions is less than window size assigned in program code, the frame will be cut from bottom and right sides.
6. Region
a. Normal - (default) is meant for standard rectangular shape
b. RoundRectShape - >> cx >>cy: round-angled (region) rectangular shape of the frame, cx - specifies the width of the ellipse used to create the rounded corners in pixels; cy - specifies the height of the ellipse used to create the rounded corners in pixels.
c. EllipticShape - elliptic shaped frame.
d. User Region - this is the very option we need for not regular frame shape designing.
Chosen "User Region" attribute for Frame Window will cause "Regions" group presence in each Frame side item
7. Caption Button Alignment
a. Right (default) - place caption buttons in a line to the right border of the frame
b. Left - align caption buttons to the left border of the frame
Note: You should alter text and icon location to avoid overlaying on caption buttons.
8. Use Semi-transparency - choose image file from your computer and make background color and position settings in the background color and image pane.
a. True - the frame semi-transparency is available
b. False - the frame semi-transparency is not available
9. Content While Dragging
a. Show - window content is seen while dragging
b. Hide - window content is not seen while dragging
Note: To make this property available you should go to Control Panel/Display Properties/Appearance/Effects/ on your computer and turn on the checkbox titled "Show window contents while dragging".