
 Back
BackOptions pane
"Options pane" presents a number of manipulation choices which can be displayed after you select an "Image" item in "Properties pane". "Options pane"can be used to change the appearance of a control via applying mode-specific basics. You can modify the Drawing mode by going to "Drawing mode" field when needed.
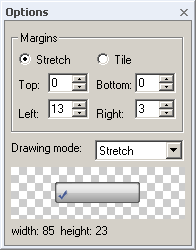
Another attribute that can be modified in "Options pane" is margins settings.
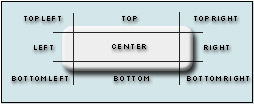
Margins are presented as the space between the edge and the central part of a component. You have Top, Bottom, Left, and Right margins. The instructions below will tell you how to change margins size in case when it is necessary.
To set margins:
 Enter a number of pixels to make margins visible from the top, bottom, left, and right edges of the image.
This prevents image edges from being excessive blurred when you stretch image on a control. Notice that SkinBuilder changes the picture representation in the Preview area simultaneously so you can see how the image will look with new settings applied.
Enter a number of pixels to make margins visible from the top, bottom, left, and right edges of the image.
This prevents image edges from being excessive blurred when you stretch image on a control. Notice that SkinBuilder changes the picture representation in the Preview area simultaneously so you can see how the image will look with new settings applied.
Specify margins "Tile" or "Stretch" Drawing mode by selecting the corresponding
radio button in the Margins group.
Carry out described procedures for each Control state shown in "Properties pane".
When you finish entering your settings, notice the changes displayed after clicking Refresh button .
.

When working with semi-transparent image (semi-transparency is also known as Alpha Channel), background is checkered. If an image is opaque, background is white.